Service Applications,
we saw how to set up the managed metadata service. Using the Term Store
repository, organizations can set up a common vocabulary for the entire
organization. Each industry — be it be healthcare, finance,
construction, or some other — has its own vernacular.
The Term Store can be leveraged across site
collections so as an organization segments its processes, each can use
terminology that is common.
With the Term Store, organizations can create a common taxonomy to be leveraged in their SharePoint 2010 implementation.
Getting ready
You must have farm-level administrative permissions to the Central Administration site.
The managed metadata service must be configured and functional.
How to do it...
Open up the SharePoint 2010 Central Administration website.
Click Application Management.
The third section is Service Applications. Under it, click Manage Service applications.
Find
the Managed metadata service instance where you have the Term Store
that you wish to manage. Hover over the name of the service and click on
it.
The following screen appears:
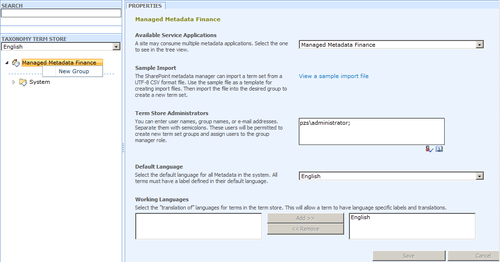
On this screen, we can assign an administrator user,
who is a domain-level account, to manage the Term Store. We can also
choose the default language. Choose New Group under Managed Metadata Finance as seen in the preceding screenshot.&;
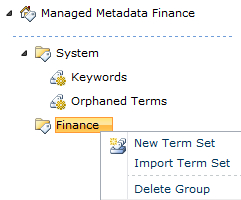
Name the new group as Finance.
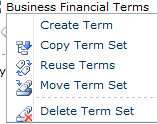
Create a new term set by clicking the drop-down list adjacent to the Finance option. Refer to the next screenshot:
Enter the term name as Business Financial Terms. We will get the following properties form on the right-hand side:
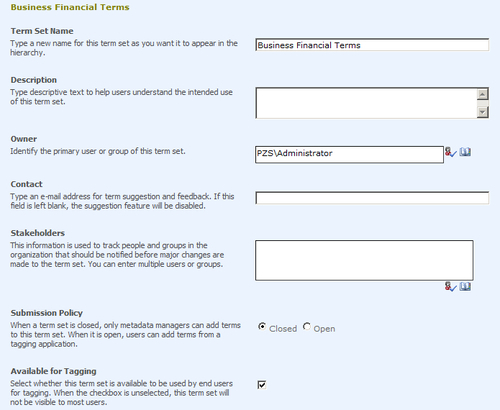
Enter values for the Description and Contact field, retaining default values for the rest of the fields.
From the drop-down list that appears to the right of the Business Financial Terms option, select Create Term.
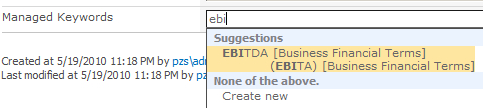
Enter EBITDA. On the right-hand side will appear the following properties form:&;
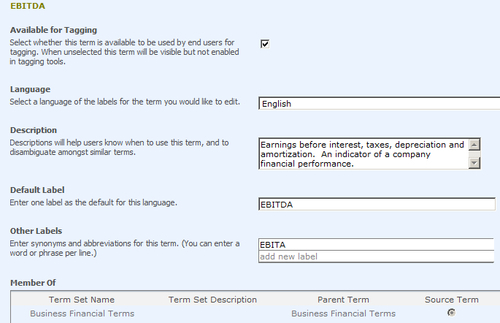
In the form, fill in the values for the Description and Other Labels field, keeping the other fields to their default values.
How it works...
The Term Store taxonomy is managed in a hierarchical
fashion, hence the term taxonomy. At the top of the hierarchy is an
object called Group. A Group is a
security construct for the management of term sets. Each group can have a
manager(s) who is/are responsible as the stakeholder(s) of the group.
Each Group can also have contributors who are able to edit and add to
the term sets and Terms.
The next item in the hierarchy is Term Set. This is a
container for Terms and can be imported or created manually as we did
in the recipe. Each term set can have an owner. The term sets are
organized into groups, which can be based on the business stakeholders.
There are a maximum of 1,000 Term Sets per group.
Finally, the last item in the hierarchy are the Terms
themselves. Each term may have a synonym, which is an alternate name
for the primary term. There is a maximum of 30,000 Terms added to a Term
Set. These are added where the Other Labels is designated. In the recipe we have just seen, a user can type in EBITA, and when the record is saved, EBITDA will be shown in the field.
These items, which include managed as well as
unmanaged items (keywords, orphaned terms), are saved in the managed
metadata database.&;
There's more...
Manually creating Terms is inefficient and not
practical when creating an enterprise information architecture.
SharePoint 2010 has the facility to import term sets. In step 7 of this
recipe, the screenshot shows a menu item of a function called Import Term Set.&;
The import file must be a comma-separated file that
contains a header row. There is a sample of an import file under the
managed metadata service. We can see from the screenshot of step 5 that
there is a Sample Import section included. To the right is a link to a sample file. Use this as your template when creating your own import file.
More info
There is a checkbox for tagging on the properties
page of the Terms object. When made available, users can utilize the
Terms to tag their documents or SharePoint pages. This gives an
organization a consistent view of their information architecture.
The following screenshot shows the type ahead capability when a user enters a managed keyword tagging to an uploaded document: